The following are the administrative procedures for on-line applications. BOE Staff will also confirm the on-Line “queue” is checked at least twice a day (recommend 10:00 am and 2:00 pm) and that all A-Permit applications submitted on-line should be processed within one business day of receipt.
PREPARING THE ONLINE "A" PERMIT APPLICATION
Prior to starting an application, City staff will confirm if the A-Permit being applied for is a valid request (vetting process documented under each construction type).
- Open the Customer Portal.
- Click "Online Service Available" under A-Permit.
- Click "Login & New Accounts on the left menu.
- Once logged in, click “Apply for a New Permit” on the left menu.
Start New Application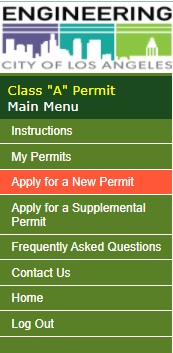
- Click “Apply for a New Permit”
- Click “Start” on the Application Requirements Screen
Complete Applicant Information
- Click “Complete Applicant Information”
- Insert Applicants email address. This is the address for which the Applicant wants the permit filed under. This is the address all information about the permit will sent.
- Click Search
- Existing Customer (option to select was given after clicking Search):
- If the email address has been used in the past, this will come up on a list and should be selected.
- Click “Select” in the last column
- Select the appropriate “Applicant Role” from the drop-down menu
- Agent
- Contractor
- Homeowner
- Owner/Developer
- Private Engineer
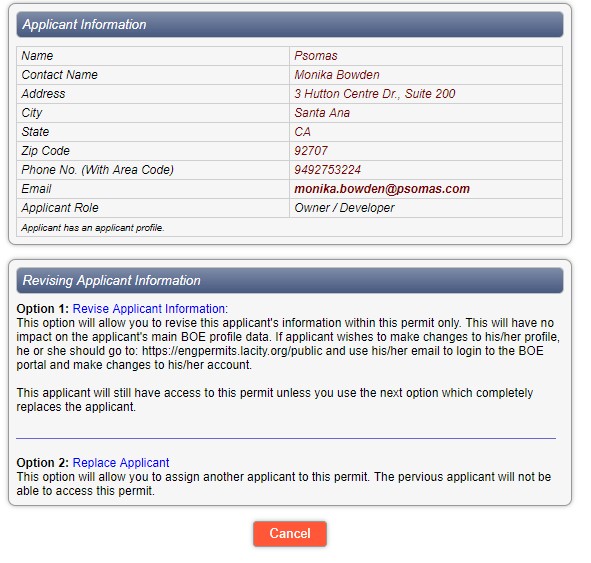
- Click “Save”
- New Customer (No Account Found under this Email will show on the screen):
- Click “Create New Account”
- Complete all the information on the screen that are required
- Click “Next”
- A message screen appears with the following: A-Permit - Reference Number 66928
An Account is Successfully Created for the Applicant - Click “Next”
Complete Job Location
- Click “Complete Location”
- Insert the House Number of project

- Street Name for the project (enter just the name without the direction N, S, E, W or the street suffix like Ave., St. Cr., etc.)
- Select the correct address from the list provided. If more than one option is listed with the same address, you will need to check NavigateLA prior to moving forward:
- Type in the address in the “Search NavigateLA” box
- Compare the APN and PIN numbers listed in NavigateLA with the information on the A Permit Application.
- Select the entry on the A Permit application that matches the information shown on NavigateLA
- If nothing shows as an option to select you will have to select “No Matching Address” or “Try Again”
No Matching Address
- Click “Add Property Address”
- Open NavigateLA
- Type in the address in the “Search NavigateLA” box
- Make a note of the following (will need to be inserted into the A Permit Application fields.
- Zip Code
- Engineering District
- Council District
- Assessor Parcel Number (APN)
- Unit Range (if applicable)
- Complete all the fields with the desired information
- Click Save
Try Again (this is usually selected if there was a typo)
- Insert the House Number of project
- Street Name for the project (enter just the name without the direction N, S, E, W or the street suffix like Ave., St. Cr., etc.)
Work Description
- Select “Work Description"
- Insert information in all the required/appropriate fields
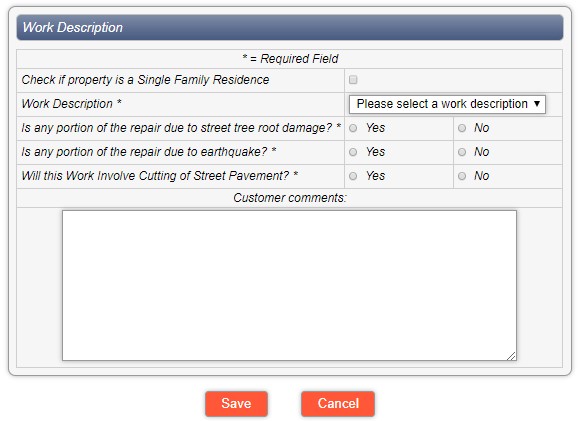
- Check if property is a Single-Family Residence
- Select the “Work Description” from the work description drop down menu
- Resurfacing
- Repair
- Remodel
- New
- Select Yes or No for “Is any portion of the repair due to street tree root damage?*”
- Select Yes or No for “Is any portion of the repair due to earthquake? *”
- Select Yes or No for “Will this Work Involve Cutting of Street Pavement? *”
- In the “Customer Comments” box enter any information BOE Staff need to know.
- Click Save
Complete Driveway Information
- Select “Complete Driveway(s) Information”

- Select Yes or No, if no, the applicant will go back to the main page. If yes, complete the following:
- Select a case (Standard Plan S-440-4) by filling in the bubble according to the displayed sketches
- Case 1 – Primarily for residential driveway aprons
- Case 2 - Primarily for commercial property and multi-family properties over four units
- Case 3 - Primarily for residential driveways where a utility or other obstruction is adjacent to the apron
- Select a Driveway Category
- Select a Driveway Type
- Insert the Driveway Approach Measurements
- Width of Driveway Approach (W) _____ ft. and _____in.
- Distance from curb to back of sidewalk (A) _____ ft. and _____in.
- Width of gutter (GW) (Inches) _____ ft. and _____in.
- Curb Height (CH) (Inches) _____ ft. and _____in.
- Select Yes or No - Are there any trees, fire hydrants, street lights, traffic signals, or other items in or near the driveway opening? (Disregard any items that are 10 feet or more away from the opening.)
- Click “Add Driveway” or “Done with Driveways” (you can also edit or remove any previous entries)
- Select a case (Standard Plan S-440-4) by filling in the bubble according to the displayed sketches
- Select Yes or No, if no, the applicant will go back to the main page. If yes, complete the following:
Complete Sidewalk(s) Information
- Select “Complete Sidewalk(s) Information”

- Select Yes or No, if no, the applicant will go back to the main page. If yes, complete the following:
- Check whether or not this Permit Includes Constructing or Replacing a Sidewalk(s)?
- On the Add Sidewalk screen insert the following information (you can add more than one sidewalk per permit).
- Length of Sidewalk Segment _____Foot ______Inch
- Width of Sidewalk Segment _____Foot ______Inch
- This Sidewalk Work is for: Repair, Replacement, or New Construction
- Click Add Sidewalk
- Select Yes or No, if no, the applicant will go back to the main page. If yes, complete the following:
- Click “Add Sidewalk” or “Done with Sidewalk” (you can also revise or remove any previous entries)
- Click Add Sidewalk if the project calls for more than one segment of sidewalk. This helps the inspector determine which area to inspect.
Complete Other Information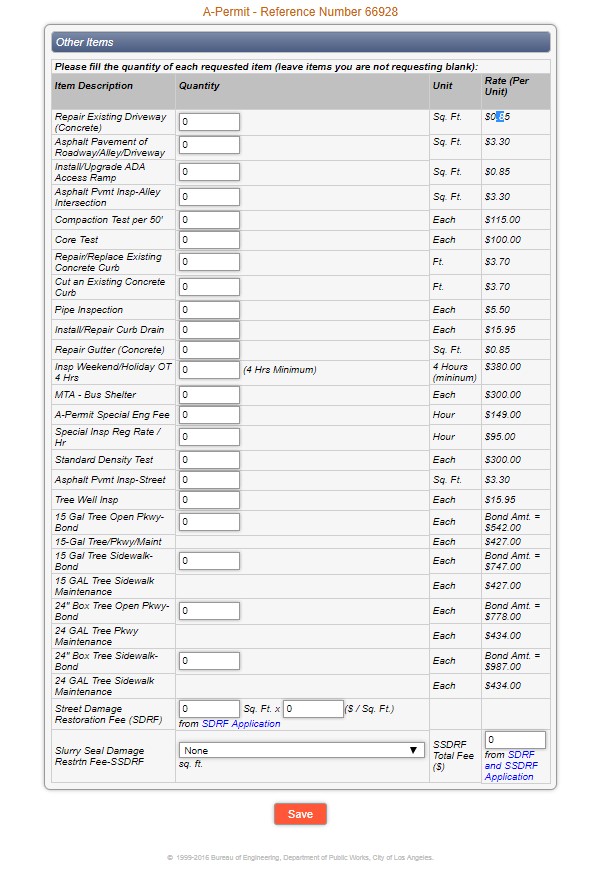
- Select “Complete Other Items”
- Insert any appropriate information in the fields provided
- Repair Existing Driveway (Concrete) OR Concrete Pavement Insp- Driveway: Enter the square footage of the driveway that will be constructed (widening, partial repair, non-standard driveway)
- Asphalt Pavement of Roadways/Alley/Driveway OR Asphalt Pavement Insp-Driveway: Enter the square footage of the driveway that will be constructed (widening, partial repair, non-standard driveway). Asphalt pavement must always be 2-feet times the width of the curb and gutter to be installed
- Install/Upgrade ADA Access Ramps OR Concrete Pavement Insp- ACC Ramp: Enter the square footage of the curb ramp only
- Asphalt Pavement Insp - Alley Intersection: Enter the square footage of the alley intersection only, not the alley pavement (B-Permit required for alley pavement). Standard Plan 420-2 defines an alley intersection.
- Compaction Test per 50': Calculate the linear footage of the section that will be backfilled, i.e., 100' equals two compaction tests.
- Core Test: Input the number of cores that will be done in the sidewalk and/or roadway
- Repair/Replace Existing Concrete Curb OR Concrete Curb Insp: Enter the linear footage of the curb to be repaired/replaced
- Cut an Existing Concrete Curb OR Concrete Curb Insp- Curb Cuts: Used for driveway widening only when removing the curb adjacent to the existing driveway (including the "X").
- Pipe Inspection: BOE does not use this item and it’s up to BCA to remove from LAMC.
- Install/Repair Curb Drain OR Area Drains*: Enter the quantity of the curb drains to be installed
- Repair Gutter OR Concrete Gutter Inspection: Enter the square footage of gutter to be repaired/replaced
- Insp Weekend/Holiday OT 4 Hrs: Enter "1' for half-day inspection and "2" for a full-day of inspection. BOE staff should contact BCA two-days prior to completing this quantity to verify if staff is available to work overtime. Each district office should contact the BCA Senior Inspector who is responsible for making decisions for the District.
- MTA Bus Shelter: Enter the number of bus shelters that are being moved.
- A-Permit Special Engineering Fee: Per LAMC 61.14 - Special Engineering Fee, BOE permits and services identified in this Code for which a fee is charged, and which require Bureau staff time for plan checking, field investigation, project evaluation, or other work or effort in addition to that which is ordinarily required for the permit or service for which the fee is charged, the following fees shall apply:
- BOE services that require 16 or fewer additional hours of Bureau staff time, a Special Engineering Fee of $149 per hour shall be charged for each hour of additional service, up to a maximum of 16 hours total; and
- BOE services that require more than 16 additional hours of Bureau staff time, the Bureau will charge and collect the actual cost of its services pursuant to the provisions of LAMC 61.15, unless a provision of this Code provides for a different fee amount.
The provisions of this section shall not apply to any BOE fee that requires payment of actual Bureau costs rather than a fixed pre-determined fee amount.
- Special Insp Reg Rate / Hr: Used when the BCA inspector requests additional time for inspection.
- Standard Density Test: Ask Carl/BCA(Bert to check) what this is used for
- Asphalt Pvmt Insp-Street: Enter square footage of asphalt being installed behind the curb (not common).
- Tree Well Insp: Enter the number of tree wells being installed. A tree well is located within the sidewalk (not within the parkway). This will also require approval from Urban Forestry.
- 15 Gal Tree Open Pkwy-Bond: Enter the number of trees being installed in the parkway as the quantity. This amount will populate the maintenance item below ("T") on the final permit. Applicant shall provide proof that Urban Forestry has confirmed the quantity of trees being installed.
- 15-Gal Tree/Pkwy/Maint: No entry is allowed here and the number from "S" above will populate this item on the final permit
- 15 Gal Tree Sidewalk Bond: Enter the number of trees being installed in the sidewalk as the quantity. This amount will populate the maintenance item below ("V") on the final permit. Applicant shall provide proof that Urban Forestry has confirmed the quantity of trees being installed.
- 15 Gal Sidewalk Maintenance: No entry is allowed here and the number from "U" above will populate this item on the final permit
- 24" Box Tree Open Pkwy-Bond: Enter the number of trees being installed in the parkway as the quantity. This amount will populate the maintenance item below ("X") on the final permit. Applicant shall provide proof that Urban Forestry has confirmed the quantity of trees being installed.
- 24 GAL Tree Pkwy Maintenance OR 24" Box Tree/Pkwy/Maint: No entry is allowed here and the number from "W" above will populate this item on the final permit
- 24" Box Tree Sidewalk Bond: Enter the number of trees being installed in the sidewalk as the quantity. This amount will populate the maintenance item below ("Z") on the final permit. Applicant shall provide proof that Urban Forestry has confirmed the quantity of trees being installed.
- 24 GAL Sidewalk Maintenance OR 24" Box Tree Sidewalk Maintenance: No entry is allowed here and the number from "Y" above will populate this item on the final permit
- Street Damage Restoration Fee (SDRF): Enter the number from the manual calculation based on LAMC 62.06 - Establishment of a Street Damage Restoration Fee. This is only required if the project is removing AC base in the roadway.
- Slurry Seal Damage Restrtn Fee -SSDRF: No longer used
- SDRF/SSDRF Eng. Admin. : Automatically calculated per the current FY fee list
- Click Save
Add Attachments
- Applicant will upload any documents, photos, sketches, etc. they want the City to have.
- Select “Add Attachments”
- Click “Submit Application"
FINALIZING THE A-PERMIT
 Fee Waivers
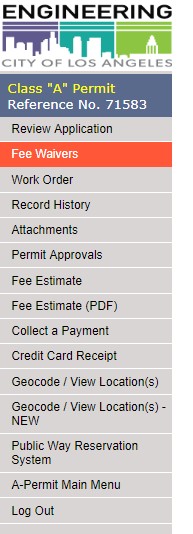
- Click “Fee Waivers” on the left menu. Note at the bottom of the Fee Waiver screen the legal documents and determinations that are applicable to waiving fees.
- Select the appropriate fee to waive by checking the “Waive Fee” check box
- Choose from the drop-down menu the reason for waiving the fees
- Click Update
Work Order
This function is typically not used for A-Permits since A-Permits are a “flat-fee” permit.
Record History
If you click “Record History” from the left menu a screen will appear that shows updates and actions to the permit.
Attachments
- Click “Attachments” from left menu
- Upload any typical attachments, which may include but not be limited to:
- Transaction receipt
- Sketches/Plans
- Planning Case Referral Form
- Photos
- Historic Preservation Overlay Zone (HPOZ) approval letter
- LADOT approvals
Permit Approvals
- Click “Permit Approvals” from left menu
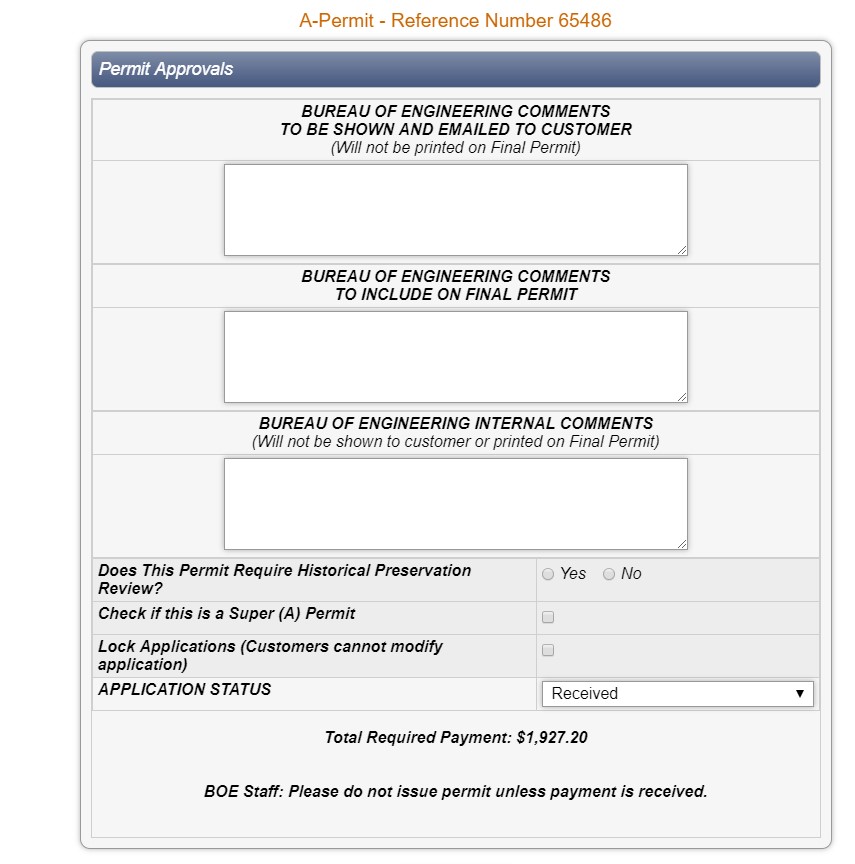
- In the “Bureau of Engineering Comments to be Shown and Emailed to Customer (Will not be printed on Final Permit)”, City staff would enter any information they need the customer to know. This would be anything outside of the general comments that are included at the bottom of the A Permit.
- In the “Bureau of Engineering Comments to Include on Final Permit” box, insert the scope of work to be completed. This could also include:
- Required other department approvals
- LADBS permit application number
- Call for Inspection comment (this is duplicative but important)
- Identify associated planning action, 12.37 action, etc. associated with this permit)
- In the “Bureau of Engineering Internal Comments (Will not be shown to customer or printed on Final Permit)" field, insert any internal notes City staff may have regarding the application that other City staff should be made aware of. Comments could include:
- 1/24/18 – Requested customer bring in LADBS approved plans
- Customer to pay permit fee prior to issuance
- HPOZ Approval required prior to approval
- Does This Permit Require Historical Preservation Review because the project is located in a Historic Preservation Overlay Zone (LAMC 12.20.3)? Prior to clicking the “Yes” or “No” box, do the following:
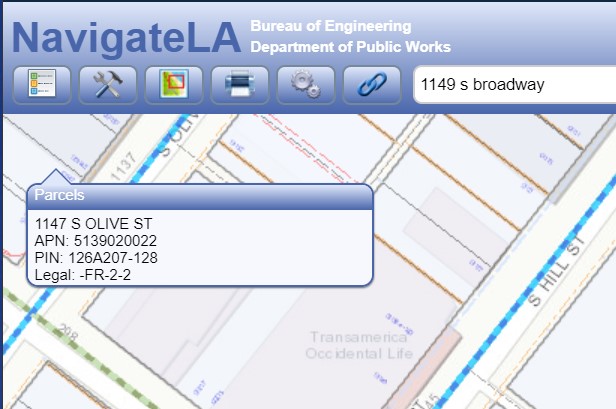
- Go to NavigateLA
- Type in the address of the project location
- Click on the “Show Table of Contents”, and type Historic Preservation Overlay Zone District which turns on the Historic Preservation Overlay Zone layer
- Confirm whether or not the project is located in a Historic Preservation Overlay Zone
- In the field “Check if this is a Super (A) Permit” click on the box if applicable.
- City staff should ALWAYS click the field “Lock Applications (Customers cannot modify application)”. Once clicked the customer can’t make changes to the submitted application.
- In the “Application Status” drop down select one of the following:
- Received – This is the “default” status that shows up when the applicant submits via the on-line system.
- In Progress (Not Submitted) – This is the status automatically given by the system when an applicant has NOT completed the application. The status will automatically change to Received once the applicant clicks the submit button.
- Cancel Application – This is selected when the applicant cancels the application or if the permit has passed the 6-month expiration date. Permits issued during the COVID-19 pandemic are subject to different requirements.
- Estimate Only – This is primarily used when a customer is inquiring about the specific costs to construct a project.
- Incomplete Application – Application has been submitted but is missing information such as:
- Departmental / Bureau Approvals
- Quantities
- Supporting documentation
- Sketches/Photos
- Approve Until Payment – This is used when everything in the permit application is approved and ready to go but payment has not been received
- Issue Permit – The application is complete, paid for, ready to be issued
- Print two copies of the issued permit
- If the permit is issued in person (not on-line from the applicant’s home or office) the permittee must sign and initial the both copies of the permit.
- If the applicant wishes to pay while at the District Office, staff would collect the payment and take it to the cashier.
- The cashier would process the payment and stamp one copy of the signed permit. The other signed permit would have the receipt attached.
- Make a copy of the stamped permit, stamp this with the “City Inspector’s Copy” stamp and return this copy to the customer.
- Instruct the customer to call for inspection prior to the start of work
- Scan and upload the stamped copy to the “Attachments” section of the permit.
Fee Estimate / Fee Estimate (PDF)
- Click “Fee Estimate / Fee Estimate (PDF)” from left menu
- Review the application for any missing information
- Applicant can review the application for costs. A print out can be provided to the applicant.
Collect a Payment
- Click “Collect a Payment” from left menu. The customer generally inputs this information on their own and is then routed to the applicable District for processing. BOE Counter staff could also process the payment at the counter through Universal Cashiering.
Credit Card Receipt
Geocode / View Location(s) - NEW
Prior to or immediately after the permit is issued, BOE staff shall geocode the permit per the Geocoding Guidelines.
Public Way Reservation System (PWRS)
PWRS (LAMC 62.61.1) is a system that pulls information from NavigateLA and shows all activities in the public right-of-way in a report and map format with the goal of improving coordination of construction activities and other encroachments. BOE Staff should follow the PWRS Guidelines and provide the Applicant/Permittee with the report(s) to coordinate any potential conflicts. This action needs to be done directly preceding issuing the permit to avoid conflicts. If done too far in advance, there is a potential for new activities to be added to the system after the initial coordination.

Comments